
Xin chào tất cả các bạn,ở bài này mình sẽ hướng dẫn các bạn cách để upload một file bất kỳ từ client lên server trong java spring mvc.
Vậy đầu tiên muốn upload file các bạn cần chuẩn bị cho mình những điều kiện cần như sau :
- Download thư viện apache common-io .Tại đây.
- Download thư viện commons-fileupload .Tại đây.
- Form upload file phải có thuộc tính enctype=”multipart/form-data”
- Form upload file method = “post”
- Trong file dispatcher-servlet.xml có class để spring mvc hiểu chúng ta đang muốn upload file.
<bean id="multipartResolver"
		class="org.springframework.web.multipart.commons.CommonsMultipartResolver" />
Như vậy hoàn thành 5 bước trên.Chúng ta đã có những điều cần có để có thể upload một file bất kỳ lên server với spring mvc.Bây giờ sẽ đến các bước cấu hình và chuẩn bị các file code.
1.Trong package controller,tạo class UploadFileController :
package controller;

import org.springframework.stereotype.Controller;
import org.springframework.web.bind.annotation.RequestMapping;
import org.springframework.web.bind.annotation.RequestMethod;

@Controller
@RequestMapping(value="uploadfile")
public class UploadFileController {

	@RequestMapping(method=RequestMethod.GET)
	public String index(){
		return "upload";
	}
}
Class này gồm method index sử dụng RequestMethod.GET để hiển thị view,trang view chính là upload.
2.Trang upload.jsp nằm trong thư mục jsp có nhiệm vụ hiển thị view đối với spring mvc.
<%@ page language="java" contentType="text/html; charset=UTF-8"
    pageEncoding="UTF-8"%>
<!DOCTYPE html PUBLIC "-//W3C//DTD HTML 4.01 Transitional//EN" "http://www.w3.org/TR/html4/loose.dtd">
<html>
<head>
<meta http-equiv="Content-Type" content="text/html; charset=UTF-8">
<title>Upload file Spring MVC Framework</title>
<style>
	#upload{
		background:#E4F4F2;
		padding: 30px;
		margin-top:30px;
	}
	.left{
		float:left;
	}

	.right{
		float:right;
	}
	.clr{
		clear:both;
	}
	.img{
		width:350px;
		height:190px;
	}
</style>
</head>
<body style="margin:0 auto; width:1024px">
	<div id="upload">
		<h1>Upload file in Spring MVC Framework</h1>
		<div>
			<div class="left">
				<form action="${pageContext.request.contextPath}/upload" method="post" enctype="mutipart/form-data">
					Chọn hình ảnh : <input type="file"  value="Upload File"  name="file" /><br /><br />
					<input name="submit" value="Cập nhật hình ảnh" type="submit" />
				</form>
			</div>
			<div class="right">
				<h3>Hình ảnh đại diện : </h3>
				<img class="img" src="${pageContext.request.contextPath}/upload/springmvc.png" />
			</div>
			<div class="clr"></div>
		</div>
	</div>
</body>
</html>
Lưu ý ở đây các bạn thấy rằng form đã có những điều kiện cần để upload file bao gồm method =”post” và enctype=”multipart/form-data”.
3.File cấu hình web.xml :
<?xml version="1.0" encoding="UTF-8"?>
<web-app xmlns:xsi="http://www.w3.org/2001/XMLSchema-instance" xmlns="http://java.sun.com/xml/ns/javaee" xsi:schemaLocation="http://java.sun.com/xml/ns/javaee http://java.sun.com/xml/ns/javaee/web-app_3_0.xsd" version="3.0">
  <display-name>uploadfiledemo</display-name>
  <welcome-file-list>
    <welcome-file>index.jsp</welcome-file>

  </welcome-file-list>

   <servlet>
        <servlet-name>dispatcher</servlet-name>
        <servlet-class>org.springframework.web.servlet.DispatcherServlet</servlet-class>
        <load-on-startup>1</load-on-startup>
    </servlet>

    <servlet-mapping>
        <servlet-name>dispatcher</servlet-name>
        <url-pattern>/</url-pattern>
    </servlet-mapping>

    <servlet-mapping>
		<servlet-name>default</servlet-name>
		<url-pattern>*.png</url-pattern>
		<url-pattern>*.gif</url-pattern>
		<url-pattern>*.jpg</url-pattern>
		<url-pattern>*.jpeg</url-pattern>
	</servlet-mapping>
</web-app>
Ở đây các bạn thấy rằng khi chúng ta chạy file upload.jsp thì nó sẽ ko hiển thị được hình ảnh đại diện,lý do vì nó ko hiểu những đuôi file hình ảnh như png,gif,jpg…vv.Cho nên ở đây trong file web.xml các để spring mvc hiểu những file có đuôi như trên thì các bạn thêm đoạn code này vào :
        <servlet-mapping>
		<servlet-name>default</servlet-name>
		<url-pattern>*.png</url-pattern>
		<url-pattern>*.gif</url-pattern>
		<url-pattern>*.jpg</url-pattern>
		<url-pattern>*.jpeg</url-pattern>
	</servlet-mapping>
4.Cấu hình file dispatcher-servlet.xml :
<?xml version="1.0" encoding="UTF-8"?>
<beans xmlns="http://www.springframework.org/schema/beans"
	xmlns:xsi="http://www.w3.org/2001/XMLSchema-instance" xmlns:p="http://www.springframework.org/schema/p"
	xmlns:context="http://www.springframework.org/schema/context"
	xmlns:mvc="http://www.springframework.org/schema/mvc"
	xsi:schemaLocation="
        http://www.springframework.org/schema/beans
        http://www.springframework.org/schema/beans/spring-beans.xsd
        http://www.springframework.org/schema/context
        http://www.springframework.org/schema/context/spring-context.xsd
        http://www.springframework.org/schema/mvc
        http://www.springframework.org/schema/mvc/spring-mvc.xsd
        ">
	<context:component-scan base-package="controller" />
	<mvc:annotation-driven/>
	<bean id="jspviewResolver"
		class="org.springframework.web.servlet.view.InternalResourceViewResolver">
		<property name="prefix" value="/WEB-INF/jsp/" />
		<property name="suffix" value=".jsp" />
	</bean>
	<bean id="multipartResolver"
            class="org.springframework.web.multipart.commons.CommonsMultipartResolver">
 <!-- one of the properties available; the maximum file size in bytes -->
        <property name="maxUploadSize" value="100000"/>
</beans>
5.File index.jsp có nhiệm vụ để chuyển hướng sang view upload file .
<% response.sendRedirect(request.getContextPath()+"/uploadfile");%>
Ok,bây giờ khi chạy giao diện lên thì sẽ có giao diện như thế này :

Sau khi chọn hình và nhấn nút câp nhật hình ảnh chúng ta sẽ xử lý ở file UploadFileController để upload hình ảnh từ client lên web server.Ở đây mình override lại method index nhưng RequestMethod=”post”.
package controller;

import java.io.File;

import javax.servlet.http.HttpServletRequest;

import org.springframework.stereotype.Controller;
import org.springframework.ui.ModelMap;
import org.springframework.web.bind.annotation.RequestMapping;
import org.springframework.web.bind.annotation.RequestMethod;
import org.springframework.web.bind.annotation.RequestParam;
import org.springframework.web.multipart.commons.CommonsMultipartFile;

@Controller
@RequestMapping(value="uploadfile")
public class UploadFileController {

	@RequestMapping(method=RequestMethod.GET)
	public String index(){
		return "upload";
	}

	@RequestMapping(method=RequestMethod.POST)
	public String index(@RequestParam(value="file") CommonsMultipartFile commonsMultipartFiles,HttpServletRequest request,ModelMap modelMap){
		String nameFile = commonsMultipartFiles.getOriginalFilename();
		System.out.println(nameFile);
		if(!"".equals(nameFile)){
			String dirFile = request.getServletContext().getRealPath("upload");
			System.out.println(dirFile);
			File fileDir = new File(dirFile);
			if(!fileDir.exists()){
				fileDir.mkdir();
			}
			try {
				commonsMultipartFiles.transferTo(new File(fileDir+File.separator+nameFile));
				System.out.println("Upload file thành công!");
				modelMap.addAttribute("filename", nameFile);
			} catch (Exception e) {
				System.out.println(e.getMessage());
				System.out.println("Upload file thất bại!");
			}
		}
		return "upload";
	}
}
Mọi thông tin của file sẽ được lưu trữ trong lớp CommonsMultipartFile,do đó chúng ta có thể dựa vào đối tượng của lớp này tạo ra để lấy những thông tin của file cần thiết như tên file,cuối cùng sử dụng method transferTo để tiến hành upload file lên server.
Sau khi nhấn nút upload thì kết quả như sau,đã hiển thị được hình ảnh vừa mới upload được.

cũng như ở console đã hiển thị thông báo upload file thành công và file upload đang nằm trong thư mục upload.
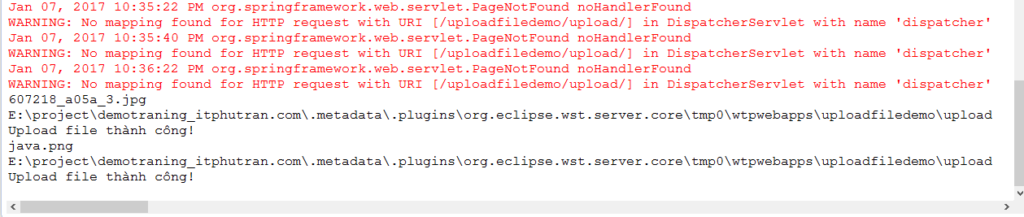
Chúng ta sẽ tiến hành coppy đường dẫn vào thư mục đường dẫn thật của project,xem đã có file vừ mới upload không?

Như hình,đã upload được hình ảnh thành công vào thư mục upload do chúng ta tạo ra.
Sau đay là code đầy đủ của trang upload.jsp :
<%@ page language="java" contentType="text/html; charset=UTF-8"
    pageEncoding="UTF-8"%>
<%@taglib uri="http://java.sun.com/jsp/jstl/core" prefix="c" %>
<!DOCTYPE html PUBLIC "-//W3C//DTD HTML 4.01 Transitional//EN" "http://www.w3.org/TR/html4/loose.dtd">
<html>
<head>
<meta http-equiv="Content-Type" content="text/html; charset=UTF-8">
<title>Upload file Spring MVC Framework</title>
<style>
	#upload{
		background:#E4F4F2;
		padding: 30px;
		margin-top:30px;
	}
	.left{
		float:left;
	}

	.right{
		float:right;
	}
	.clr{
		clear:both;
	}
	.img{
		width:350px;
		height:190px;
	}
</style>
</head>
<body style="margin:0 auto; width:1024px">
	<div id="upload">
		<h1>Upload file in Spring MVC Framework</h1>
		<div>
			<div class="left">
				<form action="${pageContext.request.contextPath}/uploadfile" method="post" enctype="multipart/form-data">
					Chọn hình ảnh : <input type="file"  value="Upload File"  name="file" /><br /><br />
					<input name="submit" value="Cập nhật hình ảnh" type="submit" />
				</form>
			</div>
			<div class="right">
				<h3>Hình ảnh đại diện : </h3>
				<img class="img" src="${pageContext.request.contextPath}/upload/
					<c:choose>
						<c:when test="${filename ne null}">
							${filename}
						</c:when>
						<c:otherwise>
							springmvc.png
						</c:otherwise>
					</c:choose>
				"/>
			</div>
			<div class="clr"></div>
		</div>
	</div>
</body>
</html>
Cấu trúc đầy đủ của dự án :

Như vậy quá trình upload file đối với spring mvc cũng rất đơn giản đúng không các bạn,chúng ta đã sử dụng những thư viện có sẵn nên quá trình upload file lên server cực kỳ nhanh.
Ở bài sau,mình sẽ hướng dẫn các bạn cách để upload nhiều file từ client lên server với spring mvc.Các bạn like page để những bài viết mới nhất của mình sẽ được thông báo nhé.
Chúc các bạn thực hiện thành công!
